
Recessing the Combing and Glassing the Deck
The rear half of the deck was relatively flat, which made all the strips quick and easy to fit together. The bow on the other hand, has a great deal of curve, so each strip must be tapered on both sides much like a whiskey barrel.
Starting at the center and working my way out to match the rear deck.
Where the strips hit the curved maple piece they tend to try and "dive" into the kayak which would cause a sanding and deck shape nightmare. To avoid this I use tiny pieces of scrap and glue them to the underside of the strips flanking the opening where the new strip needs to lay.
These strips get abandoned inside the deck for now, but will get cleaned up when I flip the deck. More on that later
Strip after strip the deck starts taking shape. Due to the curve it's impossible to use conventional clamps, and the strips are so thin they need to have even pressure along the length of them to get a good tight joint.
Here i'm using scraps as wedges to fit the taper, and another scrap against the soft cedar to prevent any dents. The maple strip is super hard and didn't require protection.
As I got to the final tiny strips the clamping had to get even more creative, trying to get the existing curves of the sides to line up with the new curve created by starting at the center and working out. I cant have any lumps!
These maple strips are 1/16" wide and are applying outward pressure to the strip above.
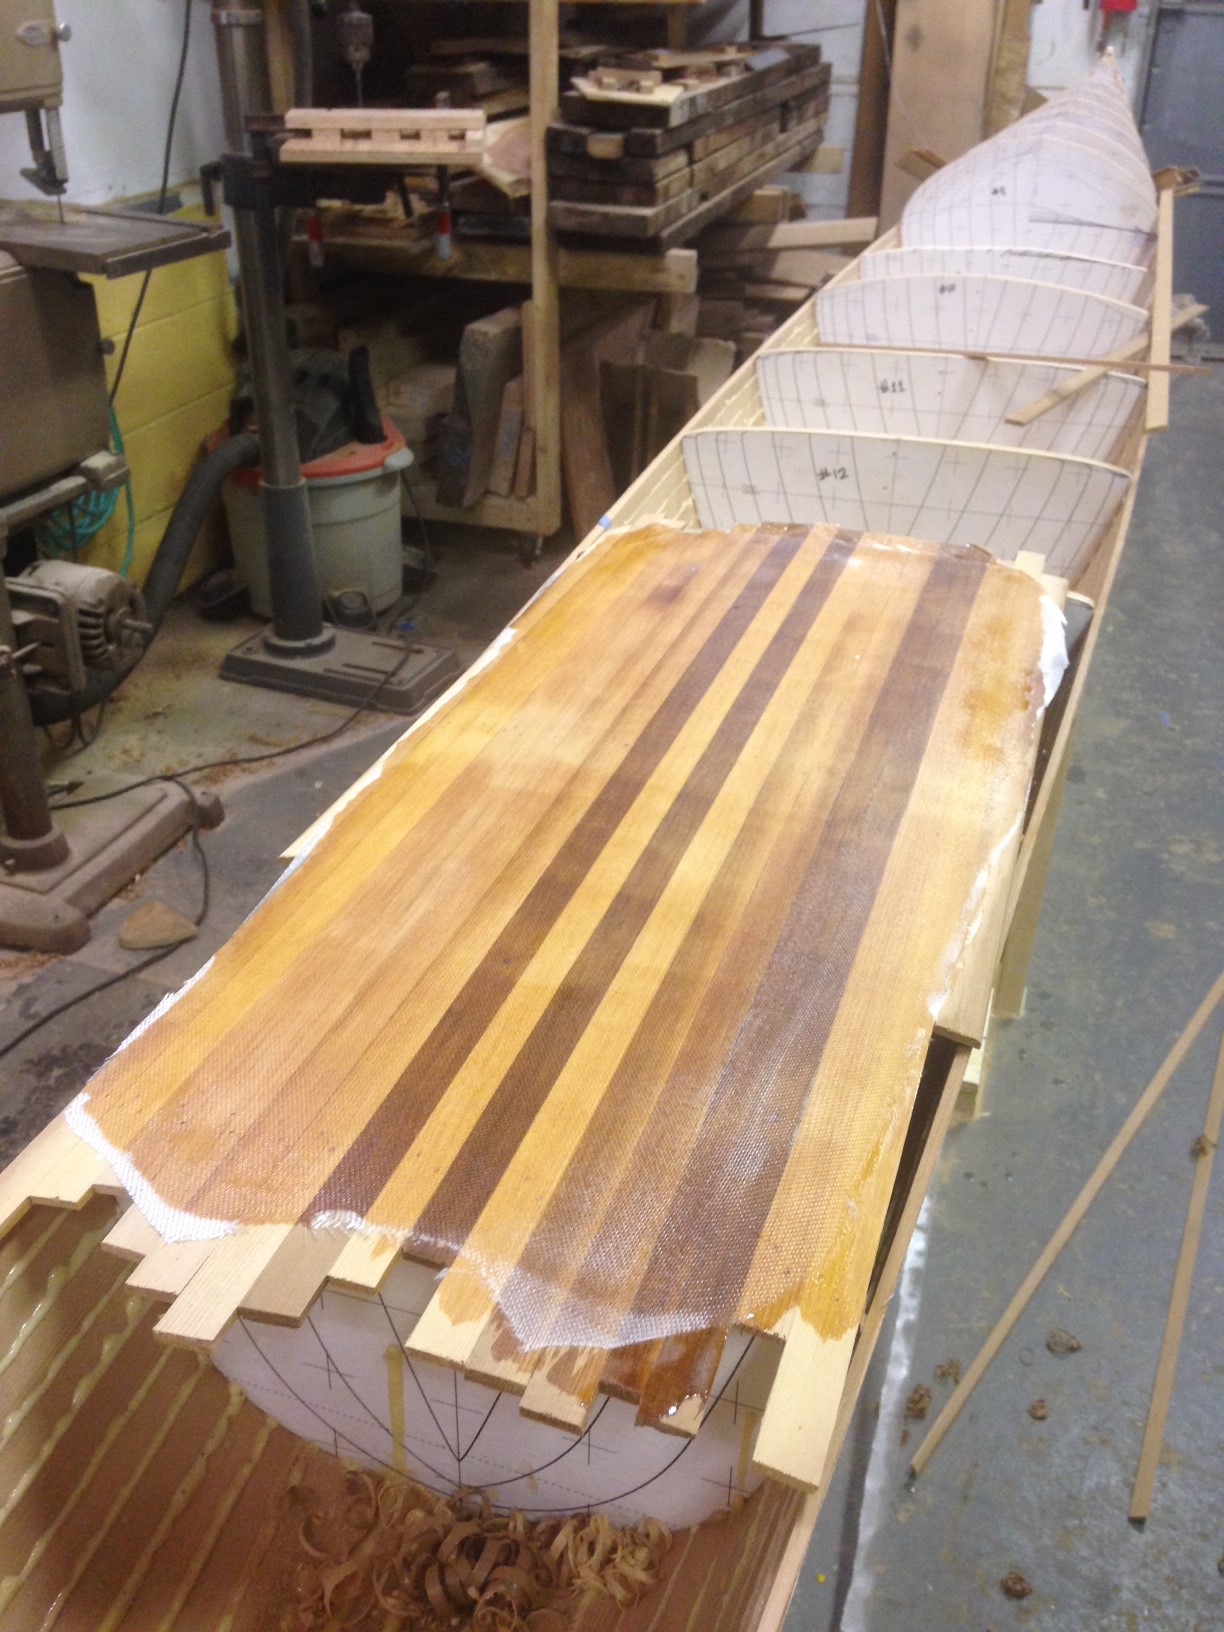
It's almost sad putting the final strip in place, but there are 10,000 steps to move on to. With the final strip fixed in place I knocked off all the glue with a sanding block and wiped on some water for a photo. I'll need to spend many more hours sanding, but this was a reassuring moment seeing the whole deck and it's colors and contrasts.
Next on the list is finalizing the cockpit opening. The plans come with a suggested curve, which I printed full scale and modified to suit my preferences.
Making a smooth flowing curve is the idea here. Sharp scissors are key!
I laid the paper on the cockpit opening and used a pencil to trace it on the cedar. I flipped the paper for get the second side, to ensure symmetry.
I was wishing I had run all my strips a little longer to give myself a little extra meat to work with, but this will work fine.
I cut out the final cockpit opening with a narrow Japanese pull style saw, but found that even with an incredibly sharp saw it was tricky to cut because the deck is so thin that only one or two saw teeth are ever engaged in the wood at any time, and it tries to catch and snag. To control tear out I went over my pencil line with a razor knife to control fibers from lifting out beyond where it wanted them to.
Being very careful
The cockpit will eventually get a combing - a raised surround with a lip to keep water out, and allow a spray skirt to attach securely. The combing will need to be about 1 1/4" tall to function, and with the petite proportions of this kayak I want to minimize how tall visually appears to be. To do this I recessed the deck at the front of the cockpit so that the combing will only project about 1/4" at the center of the deck. This also creates a "gutter" that will channel water away when spray/waves are coming over the deck.
To start the combing I grabbed a pencil and started drawing curves onto the deck area in front of the cockpit. This crescent shaped area will be removed so that later when the pieces are connected with infill bits, a slope will be created.
I ended up cutting this with a razor knife - creating a back bevel which will come in handy for the infill strips
With the crescent shape removed I cut away a portion of the center strip of the deck. When I joined the remaining unsupported pieces together again they are lower than the deck.
This was test #1, in the end I removed the entire 3/4" center cedar strip
Combing Recessed!
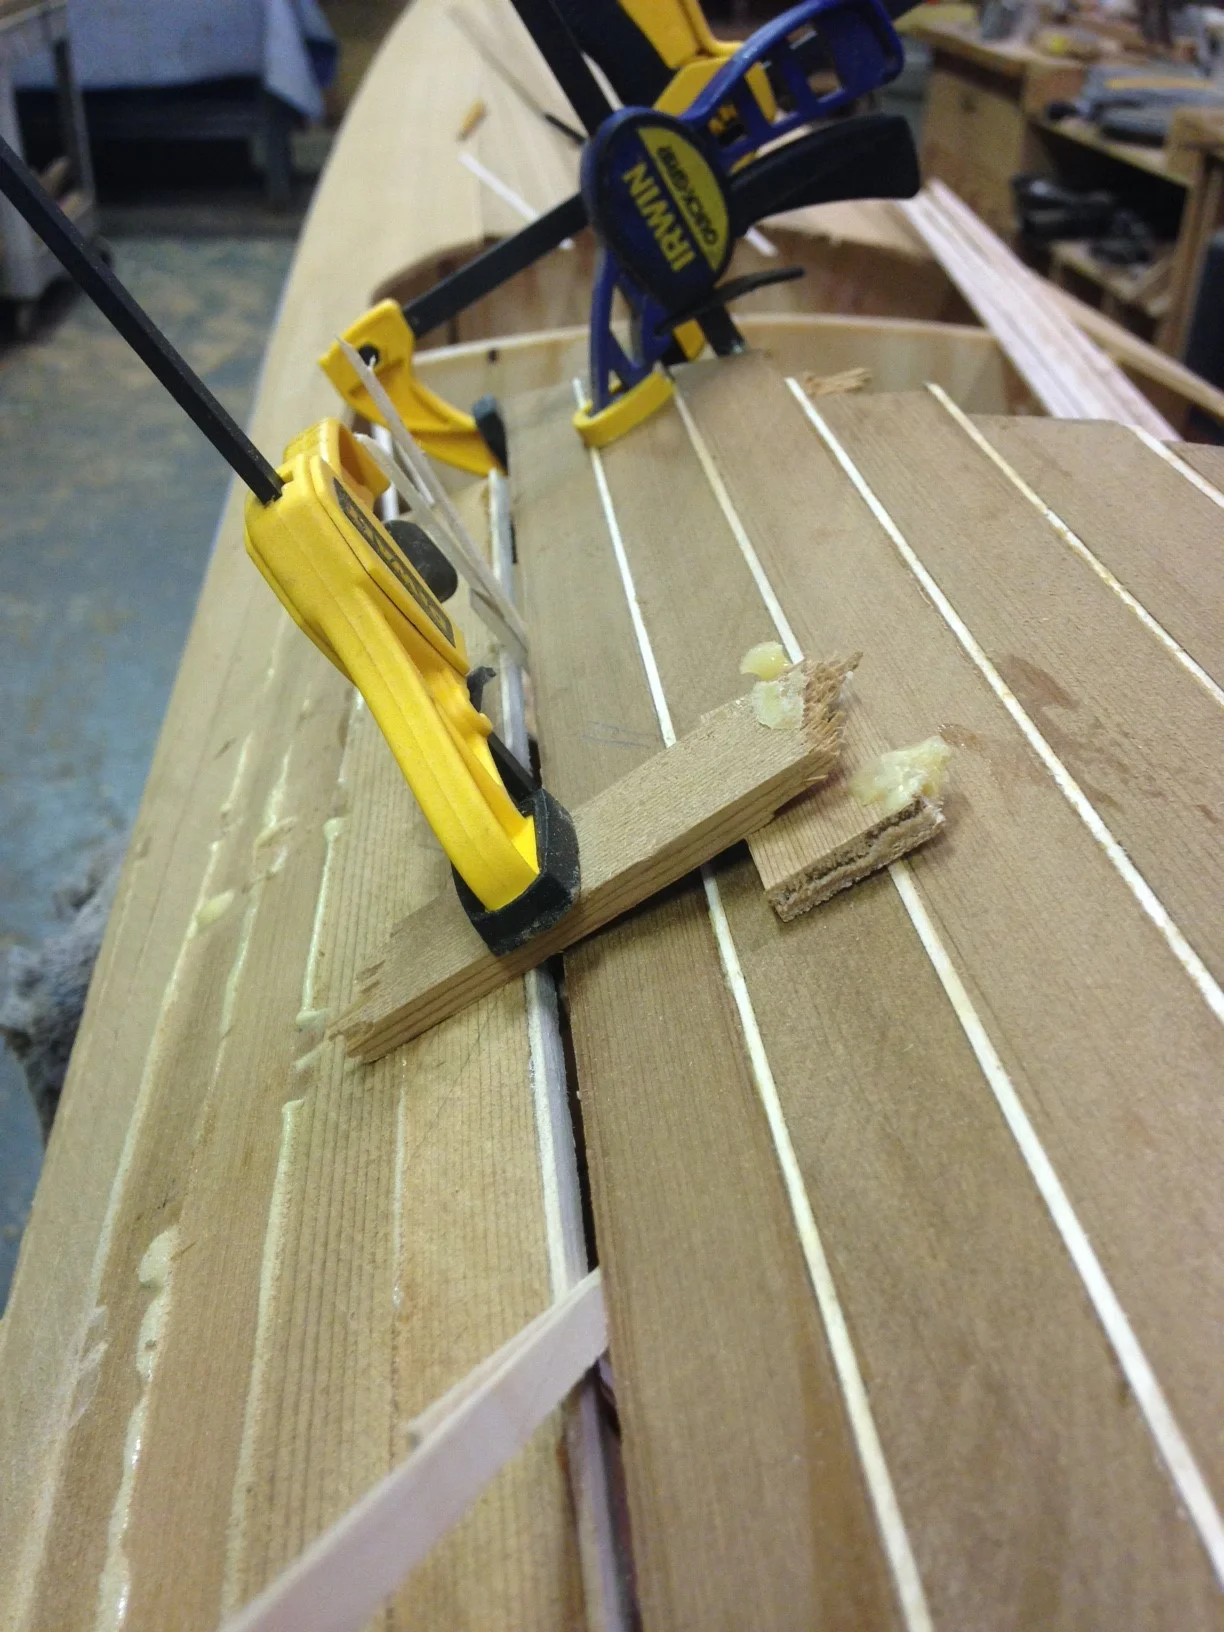
The lines of the deck are very important to me, I wanted to maintain continuity for each strips along the full length. By removing the center cedar strip from the recessed area I created a challenge - How to keep the lines flowing!
I installed each maple stripe with a tiny dab of super glue making sure each lines up perfectly.
With the maple lines in place I needed to infill the voids with dark or light cedar depending on which part of the deck i'm lining up with . This wasn't as terrible as it looks, I would get a strip close to fitting, and if it was under sized I squeezed it in a clamp which actually made it bigger in every direction. Super glue kept me moving quickly, although I did occasionally glue my fingers to the kayak.
Working with tiny pieces is made easier with tiny tools!
The process of recessing this area took about 10 hours, but the result is well worth it, and it will look even better once I build the combing and it doesn't look awkward standing up in the breeze.
A little sanding and a splash of water!
With the deck construction complete, it was time to sand and fair out any remaining humps and dips. Several days of sanding later this is what the deck looked like. Ready to lay up the fiber glass!
Sanded and cleaned - ready to glass!
The glassing process is the same as the hull: lay on fabric, get it wet with resin, and scrape away all excess to minimize weight and make sure the glass is tight to the wood I carefully sanded to just the right shape.
I let the glass drape for a few days to release any wrinkles from being folded up.
My hands were too Gooey to take any photos during the wet out. It came out fantastic!
I timed the wet out so nobody would disturb me. No visits from friends, and no phone calls. The first resin hit the deck at around midnight. Resin cures faster with heat, so I jacked up the thermostat to 80F for a few hours prior to starting. That way the wood, air and resin were all be the same temp.
The biggest risk with glassing the hull is that resin can run into the seam between the deck and hull and accidentally stick the two pieces together. That would be a disaster.
I waited about three hours for the resin to set up to a "cold honey" consistency, so I could use a razor knife to cut the fiberglass weave,while it was pretty well stuck to the deck so it couldn't shift around or lift off. I slid the razor knife between the deck and hull and slowly worked my way all the way around the kayak. When I was confident the seam was not glued, I grabbed a mallet and started knocking out the plywood forms from the inside. The Hot melt glue I used to adhere the strips comes off with a few knocks from a mallet, so in just a few minutes I had removed all the forms which freed the deck to lift up just enough to slide some scraps in and ensure that while the resin cured fully, it could not come in contact with the hull and bond the two.
The deck has been detached from the forms and hull. It is FAR too weak to move, it needed to sit here for a few days while the resin came up to full strength.
Next i'll be setting the deck off to the side to work on cleaning up and fiber glassing the insides of the deck and hull.
Thanks for reading!!
Stripping The Deck PT 2
While I HAVE been working steadily on the kayak, I have also found it difficult to find time to update the blog. Sorry its been a while, but see below for progress photos and descriptions that bring the build process up to the beginning of July.
Basically my ultimate dream boat
Many years ago as a child I was introduced to high end all wood boats with high performance Rolls Royce or other equally powerful engines cruising around at full throttle in freshwater lakes in New Hampshire. The lasting impression is that I will have to build one of these masterpieces one day, and equip it with an equally ridiculous motor (diesel).
It is my intent to layout the deck of my kayak with a color and stripe pattern to replicate the traditional pattern used on these old wood boats from the 1930's. Obviously with such drastically different proportions i'll have to get a little creative.
I started by determining how much of the deck I could cover with the parallel strips without losing the balance of the curved strips that started at the shear line. I installed a few short strips to infill the narrow gap at the bow and stern where the full length strips diverged.
These little guys are all oversize as they will get cut on a curve later.
Next I folded a piece of paper in half and cut a smooth flowing curve. I unfolded it and traced the line onto the deck. Carefully, I used a little Japanese saw to cut the curve, staying off my pencil line for now.
I used sandpaper wrapped around a bottle to sand away the remaining bits of wood to the pencil line.
Now on to making strips out of the same curly maple. Cutting them will prove to be the easy part of this!
I marked the end of the board before I cut it so I could keep track of grain orientation once the strips get tiny
When I first started this project I bought a piece of curly maple about 5 feet long. I cut the bow and stern pieces out of that board, and now i'll use the remaining chunk to generate all the strips necessary for the entire deck decorative stripping pattern.
I cut the entire board into paint stirrer size pieces - 3/16" thick. I laid all the pieces out together and was blown away by the grain!!!
Next, i'll modify my table saw set up just a little so I can turn these into 3/16" x 3/16" strips. I used a series of guide blocks and feather boards so I could keep my fingers safely far away from the blade, and eliminate any flex in each piece as it passes the blade.
The cedar strip had to be readjusted after each rip. I used hot melt glue to hold it in place.
After an evening of cutting I ended up with this small bundle of noodles.
You can see why I marked the ends when I did - since the pieces are square there would have been no way to tell orientation once they got mixed up.
All mixed up
So now all I needed to do was bend one of these little noodles into the curve in the deck to define the outter edge of my decorative strips. No big deal right? Boy was I wrong!!
I tried heat bending with a heat gun in the same manner I've been bending all the cedar strips. Fail
I tried soaking in boiling water, and over night. Fail
I tried steam bending. Fail
Finally I came to the conclusion that curly maple is basically the worst wood to try to bend ever. The grain is all crazy, and there are no oils or resins in the wood to heat up and soften it. I decided to try making some thinner strips and testing until I found a thickness that would take the curve naturally, without any heat or bending.
Fail Fail Fail Fail
Finally I got the strips down to about 1/16" wide. This worked. I held the strip in place with my finger tips, with super glue on one side (yes I have glued myself to the kayak on several occasions now) and sprayed in the super glue instant cure spray. It worked!
It looks a little rough, but it'll clean up nice!
I completed the second side and started laying out the first cedar strip.
To extend the visual impact of this detailed deck area, i'm using some cedar from my last kayak that is much darker in color. This should set it apart from the rest of the boat, and create a more dramatic contrast against the nearly white color maple
More strips...
And more strips...
Clamping starts to get challenging - I use scraps laying around to make weges pushing the new strip into place. I've got to be careful here to not dent the cedar, as the pressure to clamp it will also cause an indentation. I always protect the edge with a wider piece to distribute the force or a harder piece of maple.
Finally with the last strips in place I did a quick rough sanding to get the excess glue off and expose the grain of the maple. Very pleased with how this came out!
A little water makes the colors pop out!
I am super happy with how this turned out!!!
Really Really pleased with how this looks. I really cant wait to see it with fiberglass!
Now on to do the same thing on the forward deck, but that'll have to be another post.
Thanks for reading!
Hull Flip and Deck stripping
In wooden boat building a well known milestone is the "Hull Flip" - Most wood boats are built starting with the hull, so most builds start upside down. Flipping the hull over to begin deck work is the first time we get to actually see what the lines of the vessel look like. It's also the first time I'll get to feel the overall weight - although the plywood forms probably double the actual hull weight.
It's a little scary taking all the supports loose. Up to this point the temporary supports and forms have held everything firmly connected to the box beam below but now the forms are held in place by the dabs of hot melt glue on each cedar strip. The hull now has the strength to hold itself together and keep the forms in position relative to each other.
While the kayak is off to the side on saw horses I made up some plywood cradles to support the hull while I work on the deck.
Before I can start stripping the deck I'll need to strip two portions of the deck where the hatches will eventually go. The hatches are cut out of the deck, so they would fall right in without a ledge to support them. These blank panels have the shape of the deck so they can be mounted to the inside of the deck later on to support the deck. More on this later...
Next I move on to actually stripping the deck. The outer most seams where the deck meets the hull have to be dry fitted and not glued. This is because later on I'll need to remove the deck to gain access to remove the plywood forms and fiberglass the insides of both the deck and hull. I applied a strip of blue painters tape to act as a resist if any glue or resin accidentally wicks into the gap at the first strip.
After some more checking I discovered that the #2 form was about 3/4" too low to allow the strips to contact it, and maintain a smooth flowing curve. I'll have to let the strips "fly" over this form and eyeball the curve to make sure the curves are looking smooth.
I dealt with the 2nd form by gluing a tab on that represents where the form should have been - now I have an elevation to aim for as I strip up to it.
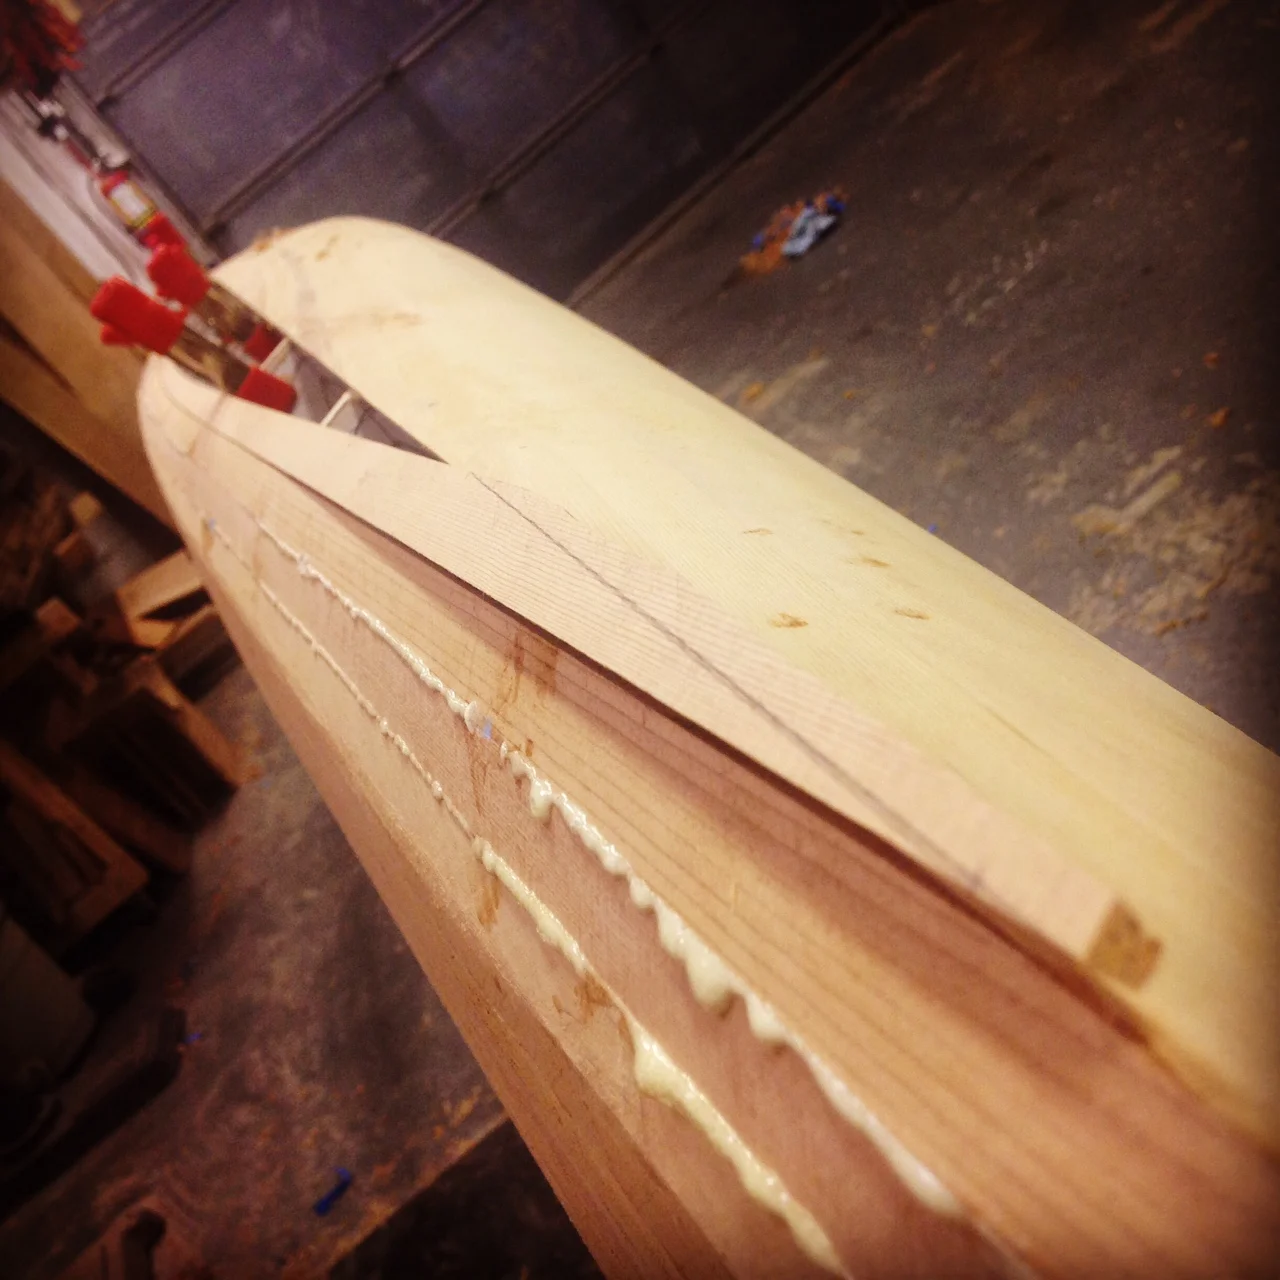
Now its just strip after strip for a while - I'll be adding some contrasting wood and a design closer to the middle of the deck, but before that I'll need to add about 6 full length strips on each side. The strips do get easier once they reach the cockpit opening, because they no longer have to fit precisely between the bow and stern. Each strip can run past the cockpit opening and be trimmed later.
Every pair of strips added shortens the necessary length of the next strips. I'm joining them down the center line to mimic the look of the hull center line joint.
I mentioned the strips get easier - originally I was running full length 20' strips - now I'm able to run strips that are approximately only 7' long because they can be rough cut at the cockpit opening.
Thanks for reading! I'm planning to reveal the deck design in my next post - stay tuned!
Glassing the Hull
Stripping the first side of the hull is quicker than the second side because all the strips can run long, and overhang the center line of the kayak. Once the first side was stripped up to the center line of the hull I re set the same string line I used months ago to align the forms and re-found the center line of the hull. It's critical at this stage to make sure the string is pulled super tight and aligned perfectly as any curve or twist will create a boat that always wants to take a right or left turn!
Here you can see I've got the string line in place, and the my hand plane has rubbed against the string a few times fraying it.
With a true/Straight center line established from bow to stern it was time to bring the strips up to center on the second side. Clamping gets trickier and space for clamps gets very narrow.
Now each strip needs to have the taper cut before it can be glued in place. I use pinch clamps to hold the strip in place so I can get a line, then take it off and hand plane to my mark.
Getting good clamping pressure takes creativity.
Strip by strip the hole in the middle gets smaller and smaller - Maybe this thing will actually float one day!
Only 3 or 4 more strips!
Finally the day comes to fit the last strip. This one is particularly tricky because it fits flat against the other side of the hull, yet needs to curve from nothing, out to 3/4", and back to nothing on the other side, and its 7 feet long. Plus it cannot be clamped so it needs to be a perfect fit.
One last strip!!
Finally the hull is stripped! The next step is possibly the most tedious of the entire building process - sanding and faring the hull into its final curved shape. Power tools of any sort are too unpredictable and could jeopardize the shape and smooth flowing curves so the only way to do this safely is by hand. I glued up several grits of sandpaper pieces of 24" x 6" plywood to make large flexible sanding pads that will bend enough to stay in contact with the hull, but also distribute the sanding pressure evenly over a large surface area to avoid digging into a particular area too much. This step takes hours and hours and hours - there is no easy way around it.
Starting to knock the hard corners off each strip to reveal the curves hidden inside.
I sanded all the glue and lumps with 60 grit paper - super aggressive considering how soft the cedar is. The 60 leaves deep scratches that will need to be worked out carefully with finer grits later. After a long night of sanding I used a wet rag to get a sneak peak at what the wood will look like once it's finished.
Even with the rough 60 sanding the curly maple grain is starting to pop!
I sanded everything over with 60 grit, then 100 grit, and did a final pass with 220 grit. Any finer and the wood surface will be too smooth for the fiberglass to get a good grip and could cause a weakness. Near the end of sanding I discovered that by turning off all the lights in the lights in the shop and using my headlamp I was able to focus only on the spot directly in front of me, instead of being distracted by the whole 20' of kayak.
The final sanding step is to wet the entire hull, which swells the individual wood cells. After it dries it gets sanded one last time (lightly) and its ready for the next step.
Now on to the fiberglass. Because this boat will never go anywhere near rocks, and also because of its general high speed/racing design, I'm using the lightest weight fiberglass possible. Heavier glasses are good for abrasion resistance, but they hold more resin which means a heavier boat. I'm using a single layer of 4 ounce glass on all surfaces on this kayak.
The fiberglass appears white because of the air between each of the super fine glass threads. This will go away when the air is replaced with clear resin.
I start by laying out the fiberglass by using my hands to push out any creases or wrinkles. I start at the center and work towards the bow or stern. It is essential for the glass to lay perfectly against the wood or I will have a lump in the kayak later on.
No wrinkles allowed!
Once i'm happy with the fabric I trim the excess off the sides to remove any weight pulling down unevenly which could distort the weave. I leave about an inch all the way around to trim later.
Ready to wet out the fabric and turn it clear!
Resin (Epoxy) comes in different mixes that cure at different rates. Since I've done this once before I decided to be a little bold and try a blend that cures more quickly so that in future steps I'll spend less time waiting for glue to cure. However, the hull is the largest area i'll have to wet out with this quick curing epoxy so i'll have to move quick to avoid ruining all my hard work up to this point. Because i was working under a time constraint, I only took one photo of the wet out while it was happening.
Applying the resin
I use a flexible plastic spatula to press the resin into the fabric, and as soon as it turns clear I use the same spatula to scrape out any available excess resin. Excess at this stage is just extra weight in the finished boat. Plus, by squeezing out any extra I ensure that the fabric is in perfect contact with the wood below. The total time spent to wet out the fabric was about an hour and a half.
The fiberglass fabric has turned clear, it's on there but you wouldn't know it!
I stayed with the kayak for a few hours making sure no bubbles showed up, occasionally I had to run my finger down the glass to press out a bubble at the very tip of the bow. The bow was too tight of a radius for the glass to bend around it, so i'll just sand this area later and brush on several layers of resin.
Now we can really see the figure of the curly maple
Epoxy cures via chemical reaction, not by drying like other glues. In order to ensure a perfect cure I followed the manufacturers specifications and brought the temperature up to 70 degrees in the shop for 24 hours before this step, and 48 hours afterwards. After about 12 hours I came back to use a razor knife to trim the excess glass off before it gets too hard and brittle.
The next step is to remove the kayak from the upright support pieces and flip it over to work on the deck. Stay tuned!
Stripping the Hull
Its been a few weeks since my last update, stripping the hull is a lot of the same task over and over so I figured I would wait to write a post until I had plenty of progress!
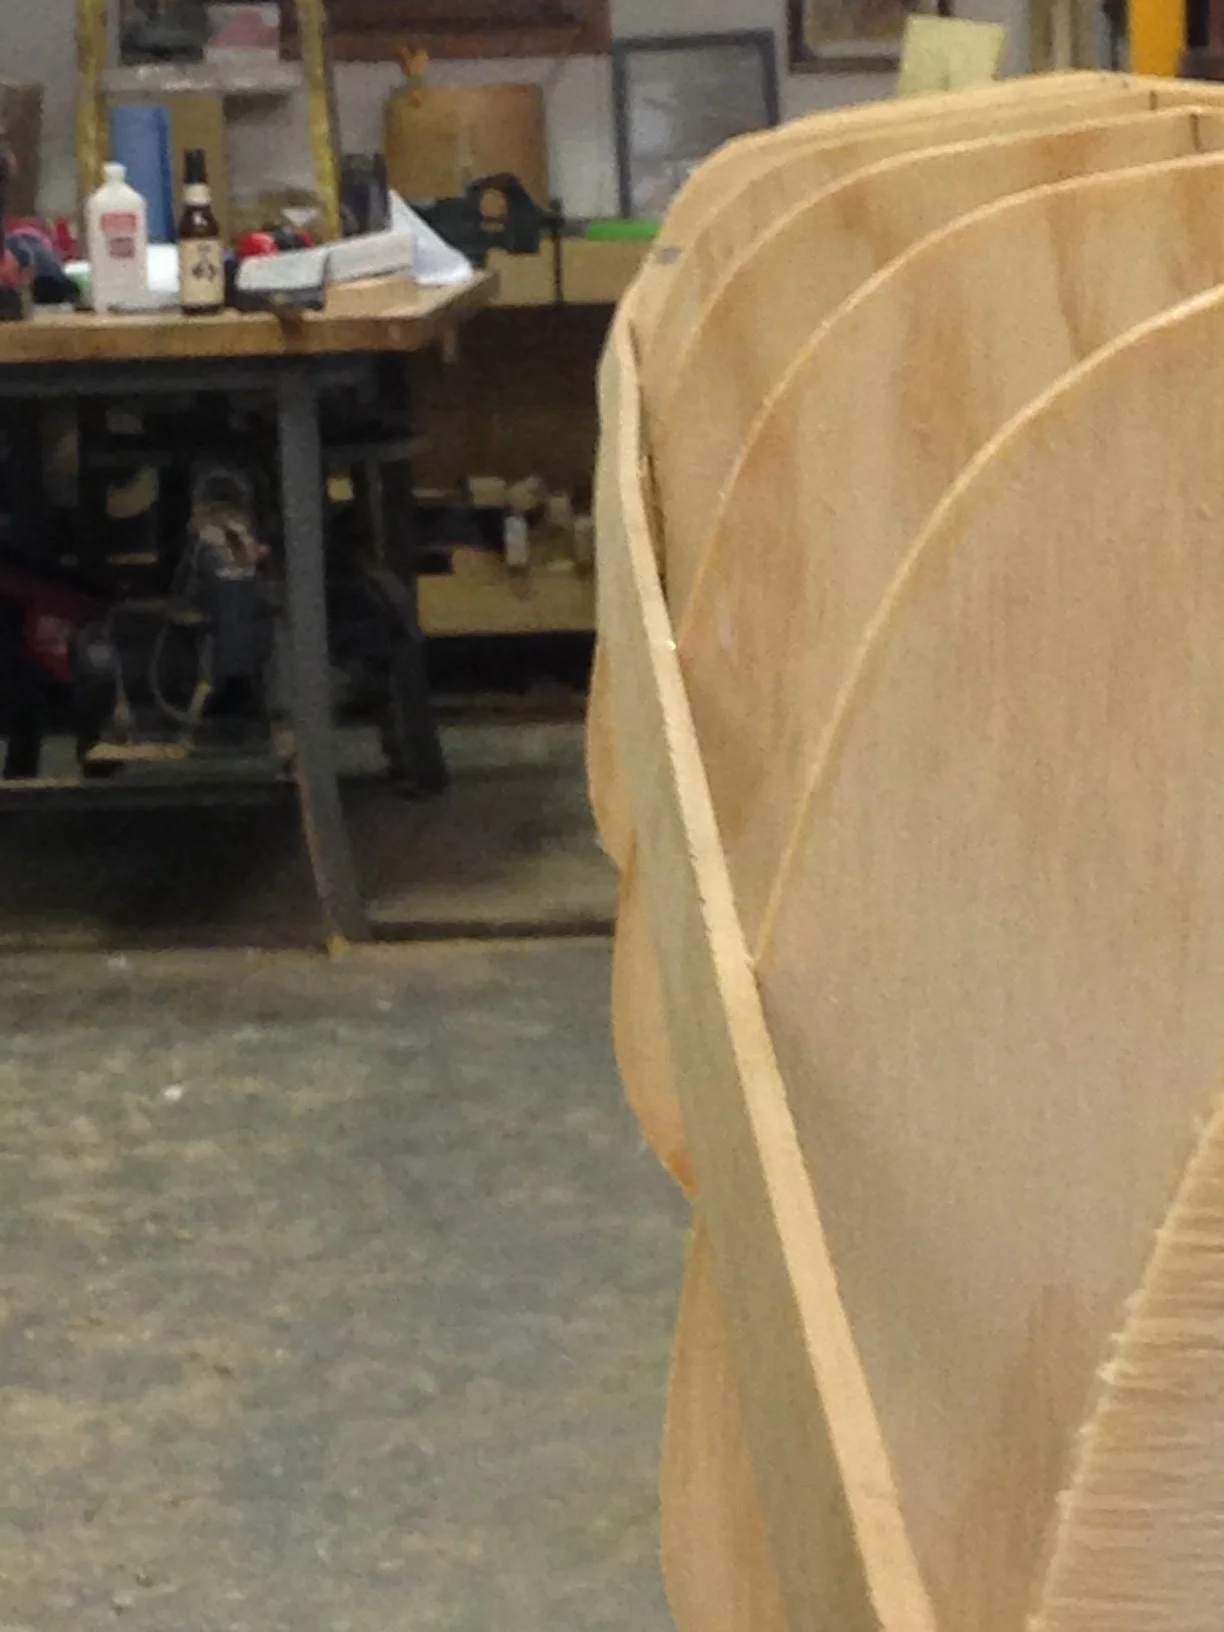
With the bow and stern held firmly aligned by only temporary supports, the next step is to add the "sheer" strips. These are the two starter strips at the widest point of the hull. These need to be aligned perfectly as they ultimately define the smooth curves where the deck meets the hull in the finished product.
Looking from the stern toward the bow. The sheer strip is the lower of the two pictured here.
To strip the hull one must temporarily affix it to the stations. This can be done in many ways, usually builders will staple through the strip and into the station. With this method the staples are removed once the hull is complete so that it can be sanded smooth. The staple method allows builders to move very quickly, it takes about one second to shoot a staple, however it leaves behind two tiny holes that will absorb epoxy later on and show up as dark spots. Also its impossible to get the staples lined up exactly the same every time, so you end up with a shoddy / crooked / slanted looking row of holes AT EACH STATION! The only time I would ever staple a boat would be if I was painting it.
Each strip must fit perfectly - in between the recessed areas of the bow and stern. If the strip is too long, it will bow out and cause an irregular curve in the hull. Too short and the strip will not meet its proper resting area in the bow or stern.
The method I use is invisible. I place a pin head size drop of hot melt glue under each strip and immediately press the strip firmly into place. The strip must be held for about 1 minute at each station to allow the glue time to cool and harden. The boat has 18 stations, so that's 20+ minutes per strip. The hot melt glue will hold tightly for sanding and fiber glassing operations, and when its time to remove the forms from inside the hull a few raps with a mallet will loosen the strips from the stations.
Gorilla Glue! This stuff is MESSY, but it works incredibly well for this application. I apply it to each strip and then flip the strip down and into place.
It should be noted that the Hot melt glue and staple methods only secure the strips to the stations. Each strip must also be glued to the previous strip as well. For that joint I prefer to use Gorilla Glue because it has a long working time, and its thick like honey and resists dripping and running. Gorilla glue also expands as it cures, filling any slight gaps.
I do not bother spreading the glue. Once the strip is pressed into place the glue oozes plenty to create a strong joint.
Each strip must be hand planed on the skinny sides to create a tight joint with the next/previous strip. Think of a wine barrel - each strip has a angle so the slats can go around a full circle and maintain contact with each other so the barrel holds water. The challenge with these strips is that the kayak is not a circle. The angle does not just change from strip to strip, but each strip requires different angles throughout its length, and if that's not enough, it needs that on both sides! I have a tiny hand plane (not pictured) that fits in the palm of my hand and is small enough that I can run my fingers along the strip to feel the angle rolling back and fourth while pushing the plane at the same time.
This is the last strip on this side that has to be fit between the bow and stern. The next few will only need to "nest" into the bow, and can run long over the stern (see next photo)
The top strip here will be planed down later to define the center of the hull
Gorilla Glue can be sanded, but the sander will ride on the high spots (the drips) and eat into the low spots (the wood). Since the wood is just under 3/16" thick, I need to be very careful with how much I remove during sanding. I prefer to use a hand scraper to remove the glue squeeze out. It took be about 45 minutes to catch up on both sides of the hull (exterior). I had to kill some time waiting for glue to dry before adding more strips so I did some scrapping ahead of time.
Here I've scrapped away 99% of the excess glue. Not bad fitting joints!
With the bow strips high enough to be "out" of the bow, the next 6 or so strips go really fast since both ends just hang long and will be trimmed later. I think I did three strips in an hour and a half. This is where the hot melt glue really shines, allowing each strip to be "clamped" in place against the station, with no clamps to be in the way and block me from adding more strips.
Starting to take shape!
I will snap a straight line down the center of the hull once I strip past the mid point and use a plane and chisel to carve a straight line.
The second side will go a little slower, each strip will have to fit perfectly again, creating the keel.
To give a sense of time, the photos in this post were all taken during a three week period, with 80% of the progress being made during the blizzard weekend we just had. I would like to complete the hull by mid February.
This is how she rests right now.
The next steps will be finishing the hull stripping, LOTS of sanding, and preparing to fiberglass the exterior of the hull.
Thanks for reading!!
Bjorn Thomasson Sea Racer - Solid wood Bow and Stern
One of the challenges building a kayak nearly 20' long is sourcing material long enough to go end to end with no splice joints. As I mentioned in the previous post, I found that the longest cedar I could obtain locally was 20'. The challenge presented is that the kayak is also 20', so due to the curves the 20' strips would naturally fall short of covering the full length.
My solution was to build solid wood bow and stern pieces that will occupy about 6 inches of the total length of the kayak. This is not part of the design, what I'm doing here is uncharted territory and must be done carefully to maintain the hull profile and not add too much weight.
I started with rough sawn curly maple from a buddy in Fredrick. The actual plans call for internal bow and stern reinforcement and gives a template for cutting those pieces. I used them as a rough guide and expanded some of the proportions to get an outline of what the outside profiles should be and traced it on to the rough maple.
I roughed out the pieces on my band saw and started creating a lip for the cedar strips to rest in. This part is pretty slow, lots of test fitting and slowing removing material.
Once I got the tapered shoulder to accept the cedar strips it was time to take the exposed bow area from a rough sawn square board and give it some shape! I generally love shaping wood, adding curves and dips and flowing surfaces, however curly maple is different... The grain rises and falls inside the board which is what gives it the curly look, but its nearly impossible to carve it using traditional cutting tools without getting tear out. I took the safe (and easy) approach and broke out my small belt sander with 80 grit paper. With a few lines drawn on the edges to make sure I was removing stock equally from each side, I started shaping. To clamp such a small piece and be able to work on the entire top surface would be really impossible, so I improvised and used hot melt glue to adhere the block to the corner of a work bench.
After about 5 minutes for each side I had the general profile roughed out. Just for kicks I sanded one side with 220 grit and rubbed some water on to get a tease for what the curly maple will eventually look like.
Once this is covered in fiber glass and epoxy this grain will really pop!
Next I did the same steps with the stern piece, which I should have started with because it is smaller and an easier shape. Here is a good photo of why its challenging to carve curly maple:
Test fitting the stern while its still blocky and easy to clamp to the work bench.
I used the same belt sanding process to shape the stern, it took about 5 minutes with the aggressive 80 grit belt! starting to look pretty slick each time I test fit it.
Up to this point I have been using the temporary strips on the forms to dictate where the bow and stern pieces need to go, and using them to sight angles/alignment. To start installing the actual strips on the kayak I'll need the temporary strips out of the way, and I'll need to support the bow and stern pieces temporarily with various supports that will not block the first 6-8 permanent strips. Once I have 6-8 permanent strips in place, they will be able to support the bow and stern and I can remove all the temporary supports.
Here you can see the stern braced in all directions, with room to add strips.
The bow all lined up and ready to add strips!
Keep in mind that the maple pieces are still rough, no sense in fine tuning them at this point as I'll need to profile the entire hull once the strips are in place.
That's about it for this weekend, I started messing with the first full length strips but I'll save that for the next post. Thanks for reading!
Bjorn Thomasson Sea Racer Christmas update
It's been a busy week in the shop, lots of progress and photos to share!
With the forms basically in place, I turned my focus on getting my workspace set up so I can be as efficient as possible. With a 20' long boat its a real pain to have to walk all the way around to the other side to reach a clamp that's only a few feet out of reach. I suspended a light weight and adjustable rack from the ceiling to store all my strips in. This will make it really easy to just reach up and grab a new strip, plus it keeps them totally out of the way and having them high in the air will keep glue drips and misc. crap off them. I made the horizontal member nice and skinny so all my clamps (even the tiny ones) can be clamped on and never be out of reach.
With the rack almost done I got distracted for a bit and started installing temporary full length strips. These strips serve a few different purposes - they hold the forms more securely in place, helping to resist flex and deflection as the strips apply various forces. I installed some diagonal bracing to create an anchor point to pull a tape measure off, so that i can set the tops of the forms at the same 32cm centers that the bases of the form brackets are set on. some stations were as much as 3cm out of tolerance, but easily fixed with the temporary support strips.
They also help to visually confirm the forms are placed correctly. It's easy to see in the photo below that station #6 has something funny going on and its MUCH easier to adjust this now than later.
The #6 form lines up correctly on the keel and starboard sides, not sure why this spot is so out of whack. I'll just "float" the strips across it keeping a close eye and after a few strips I bet they will start to lay on the station correctly again.
Starting to get an feel for how streamlined this beast is!
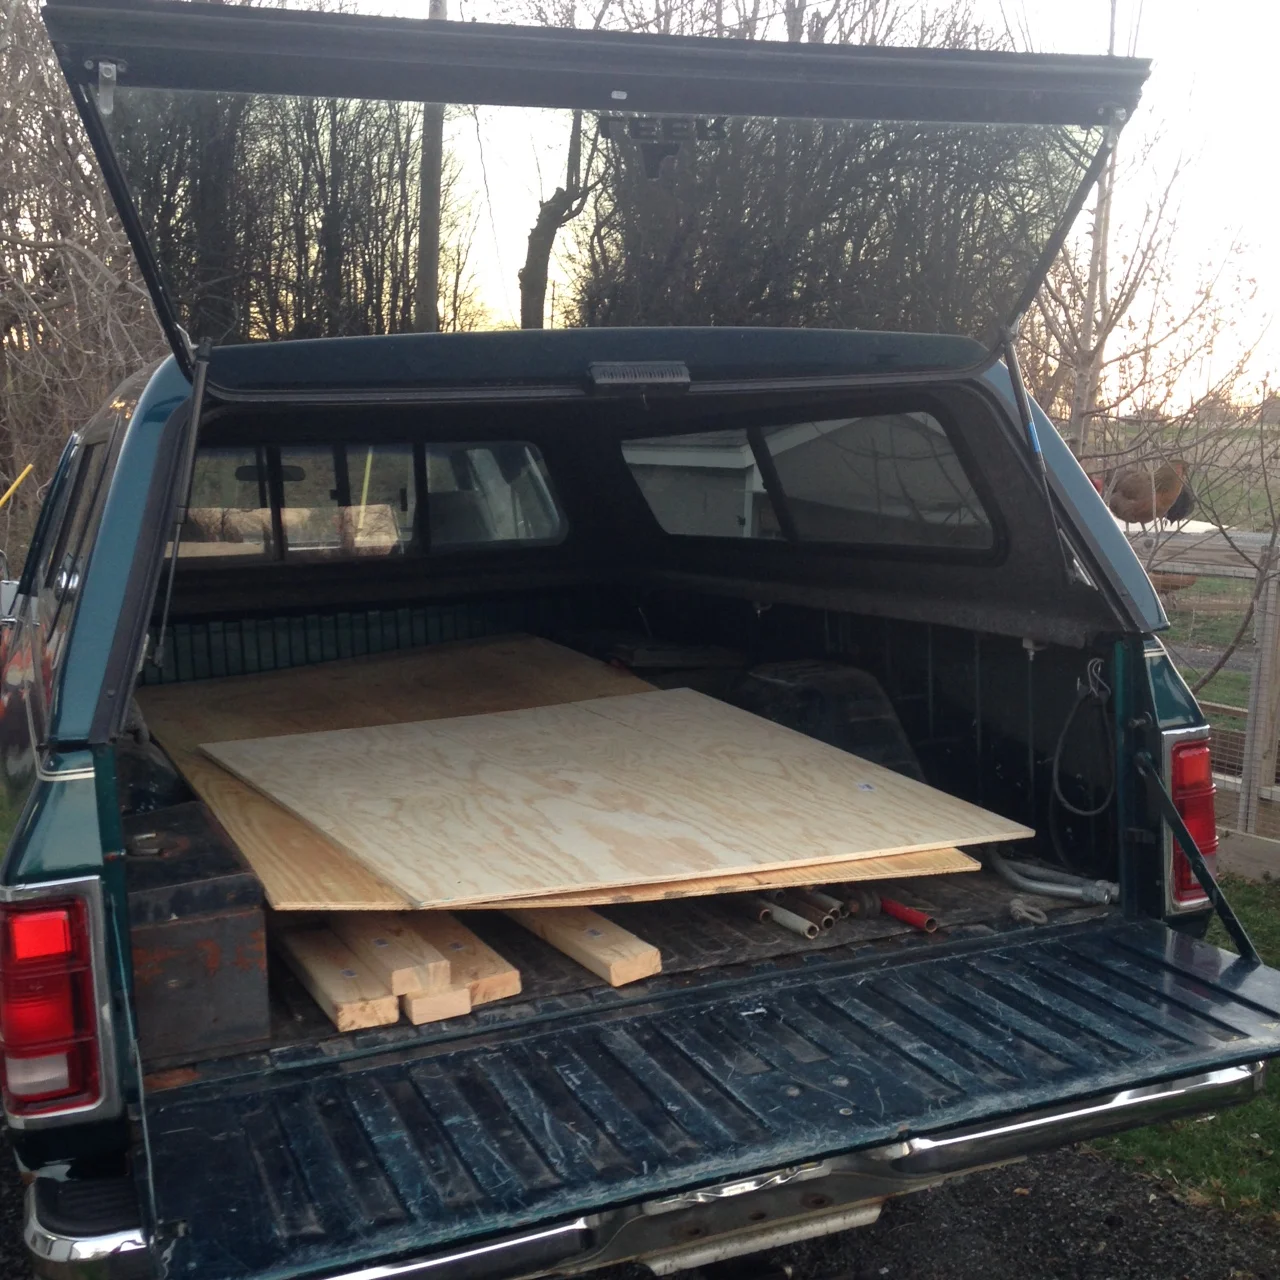
Moving on to cutting the strips. This is a delicate task with no room for error. I was able to source 2 - 20' long 2x6 vertical grain western red cedar boards from a friend who runs a lumber yard in DC. These babies are not cheap, but its pretty special to get to have full length strips with no splice joints on a 20' boat. The grain is amazing, you can put your finger on a growth ring at one end of the board, and follow it 20' to the other end of the board.
I have cut strips once before, and it required two people. This time I'm by myself, and would prefer to not have the option of blaming anyone but myself if I screw up. I created a fence extension for my contractor grade table saw out of the leftover scrap of plywood from the stations and a 2x4 screwed on edge. I installed the fence, and maintained constant pressure against the table and fence with feather boards in two directions. I also installed two ridged blocks to keep the work piece down against the table, with a few thousandths of clearance so they don't create any additional drag. I sanded the plywood surface and waxed it with paraffin so keep friction to a minimum, knowing that I'll be pushing maybe a few thousand feet of board across this saw in the next few hours.
Time to raise the blade and start cutting!
This fence system (combined with infeed and outfeed supports) makes it very safe and easy to cut 20' lengths by yourself. The one downside is that the big oak feather boards have to be repositioned after each cut. After a little while I had this pile of 3/4"x1 1/2" strips.
Next I'll reposition ALL The feather boards and cut these on the 3/4" side to create my finished strips. The finish size of each strip is 3/16" x 3/4" x 20'.
3/16" trapped between the blade and fence is not a very safe situation. The flex in such a small piece can allow it to bind and kick back or explode. I did not have any issues do to the constant pressure from the feather boards.
Starting to get skinny! Pushing 3/4" x 1/2" x 20' "noodles" gets easier as they get smaller.
I was lucky to have amazing Christmas weekend weather - 71 degrees and sunny for this whole process which made it way more pleasant to have the shop door open. To wind things down for the weekend I did a good sweep, and got my 1987 craftsman 2 stroke leaf blower to give the shop a detail cleaning before the garage door gets closed for the rest of the winter. It's fun running a leaf blower inside and very effective at scrubbing fine fine sanding dust off every surface.
I'll be heading out of town for New Years so I don't think I'll see much progress over the next week. With the shop clean, and strips neatly stacked on my new rack, I even had room for the old dodge to park inside out of the rain for a few days!
See you next year!
Final form placement
It is essential to get each form set as perfectly as possible without breaking out lasers and micrometers and stuff. I used a ruler, and a plum Bob to set an upper string line 9" above the lower strong line. The string must be incredibly tight to eliminate any sag across the 20'6' length as any sag would show up in the finished boat as a reduction in rocker.

Note how all my layout lines are visible, and connected to each other while I hold the strong away and all hidden behind the string when I'm not holding it.
Here I have mounted my riser blocks that will soon hold the stations. I'm keeping the top edge of each block just s few 1000ths below the string.

Now you see the layout lines - now you don't!
By the 18th form I had every pencil line hidden behind the string line and that's close enough to move on to aligning the stations. I cut the string off and used pinch clamps to hold the stations in place. Next I'll run some temporary cedar strips to make sure the curves are smooth and flowing as the strip contacts each form. If any minor adjustments are necessary this is my last chance to do it. I'll tack some temporary strips in place for additional strength and to prevent any stations from moving under the minor stress of mounting strips.

I am asking for clamps for Christmas!
I'm hoping to get in some good hours over the Christmas and New Years long weekends. Wish me luck!
Setting the Stations up
A strong back is used to hold each form in alignment during the building process. I had this 16' plywood beam from my pervious kayak build, but it had gotten a little loose and wiggly sitting outside for 6 years. I added 54" to one end, and went over the entire thing adding bracing plates, half a box of drywall screws and misc. brad nails. Finally I pulled out the belt sander to clean up the top surface to remove any old globs of glue and make it easier to see layout lines.
The beam doesn't need to be perfectly straight or level, we will address that later with string lines.
Next I ripped down some 2x4's to make little mounting blocks for the risers that will hold each station. I made a little bridge so a base string line can run under without touching any thing and throwing off the line. I spaced the blocks at 32cm per the drawing spec. and used a square to ling each block up perpendicular with the string line.
These are loose in this photo, I ended up using hot melt glue to temporarily tack them in place, and once I'm 100% sure about the alignment each block will get two screws down into the strong back.
To wrap up my weekend I loosely clamped a few of the stations in place, just to get a little sneak peak of what the hull is going to look like. I'll need to run a top string line and mark center lines of each of the riser blocks before the stations get mounted permanently. It's almost time to start building the actual kayak!
Don't look too closely, nothing is centered or lined up right, I just wanted to get an idea of the hull profile.
Setting up Forms
I knocked out a few small steps over the weekend, there is lots of work to do before I start building the actual boat.
A quick trip to Home Depot for basic supplies - a cheapo sheet of ply that I will use to extend the strong back, which is only 16' from the last boat but will need to be extended 4' to accommodate the Sea Racer. I picked up a half sheet of higher grade plywood (7ply?) to cut the stations out of, its helps to use nice ply because the more layers means a better chance the strips will adhere properly when I finally start stripping the hull, Also less voids within the sheet. The 2x4's and misc glues will come in handy later...
Anybody ever notice a trip to Home Depot ALWAYS costs about a hundred bucks these days??
Finished cutting the paper stations out of the plans, these have to be basically perfect as they ultimately define the hull profile.
To ensure the forms are symmetrical, I folded each station in half along the centerline and cut both layers at once.
Crossing my fingers that the forms would all fit onto my 4'x4' sheet of high grade plywood - and there was room to spare! I'll set aside the leftover piece incase I screw one up and need to replace a station.
Plenty of room!
Next I need to secure the paper to the plywood so there is zero chance of shifting around. To do this I mixed up a solution of 50/50 wood glue and water, and brushed it onto the backs of the paper templates one at a time. I gently placed the soggy sticky paper on the plywood and "ironed" each one out moving from the center towards the edges making sure theres no wrinkles or bubbles. Paper station 18 stretched about a 1/4" from too much pressure, so I had to cut a new one and replace it.
You have to move quick with this step, as the paper turns to mush quickly, and as soon as you set it on the plywood the wood wicks up the moisture and it sticks VERY fast.
I aimed a fan on the forms for about half an hour to dry the glue, and quickly chopped the sheet up with my jig saw into manageable sizes for my 1950's band saw. On the band saw I cut as close as possible to the paper forms, leaving about 1/64th of visible wood.

Björn Thomasson's Fast sea kayak built by Bryan Atkins
About 6 years ago I built my first cedar strip kayak. The experience was addictive, and I have an opportunity to build a second, starting now. Follow along as I spend a few hundred hours working on a craft that I hope will ultimately weigh in at around 35lbs, and is similar in dimensions to those boats paddled by top Olympic racers.

Starting off with 12 copies of the plans to cut up and transfer to plywood forms
Picture Framed bench back
Most of the benches I have sold slats for have been just wood slats on the seat and back. I was hesitant to work with any of the benches with the metal insert wraped in wood because the slightest error in measuring could spell disaster. Shipping these slats is a big deal, its a 4' box and weighs around 25 lbs so I never wanted a customer to ship a set back.
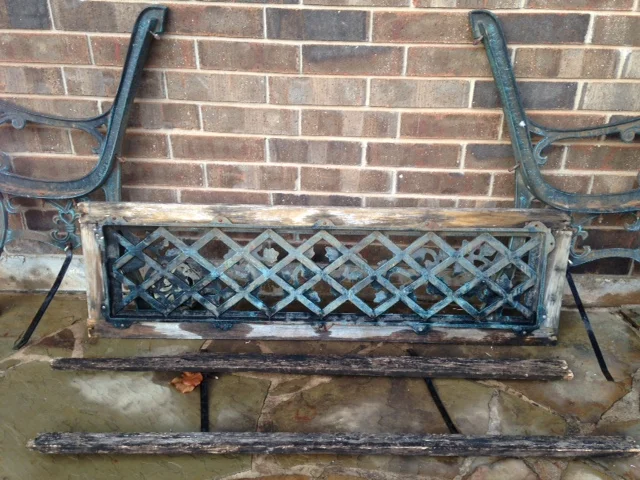
Before
Last month I had a request do one such bench, and the customer seemed so precise and confidant in his measurements that I figured I would give it a try. There is no joinery in the back pieces that wrap the metal rectangle, the shorties are just butted against the full length top and bottom. The short pieces actually don't bear any weight or stress, they are just there as fillers and only held in by two small wood screws from behind.
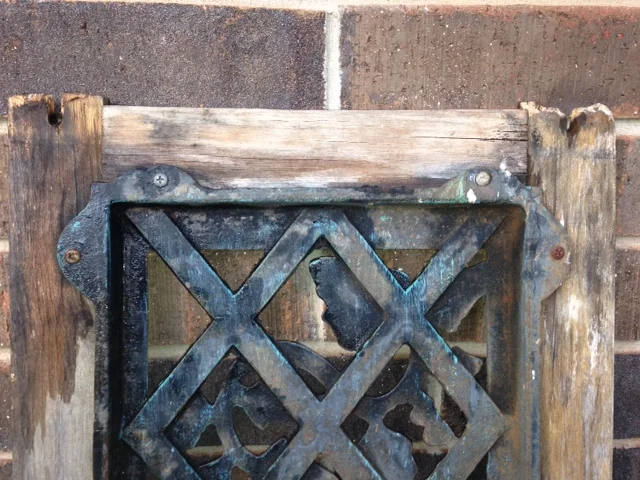
Detail of the short section/filler pieces - Only held on by two tiny screws!
The owner used a stain, and two coats of polyurethane and I think it came out fantastic! I particularly like that the metal doesn't look uniform and painted, I'm guessing he used a clear rust sealer made by Rustoleum I've seen at the Depot for use on garden tools. I honestly think this bench looks better now than when it was brand new. Great work Mike!!
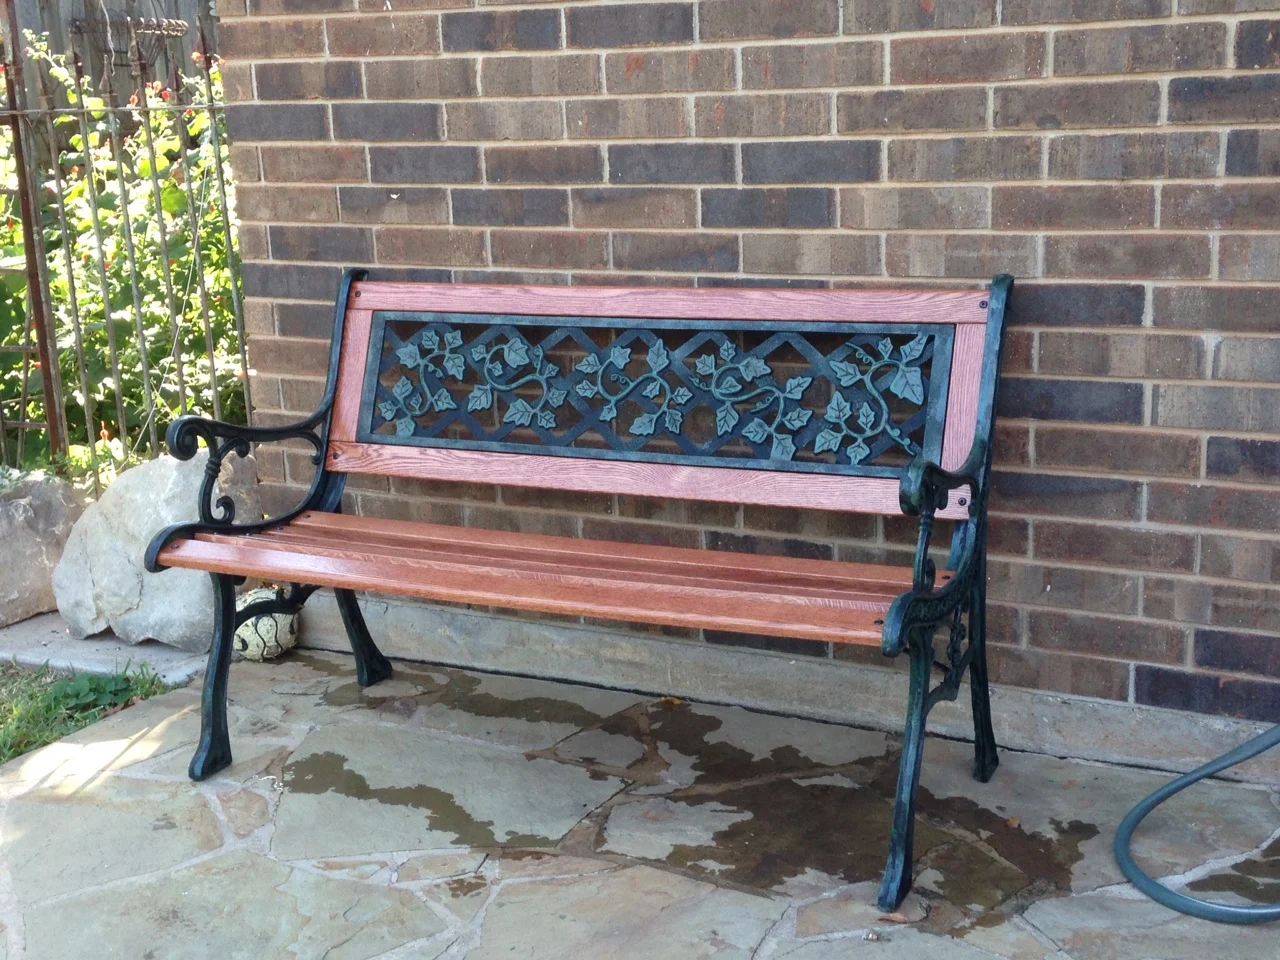
Looking good!!