
Recessing the Combing and Glassing the Deck
The rear half of the deck was relatively flat, which made all the strips quick and easy to fit together. The bow on the other hand, has a great deal of curve, so each strip must be tapered on both sides much like a whiskey barrel.
Starting at the center and working my way out to match the rear deck.
Where the strips hit the curved maple piece they tend to try and "dive" into the kayak which would cause a sanding and deck shape nightmare. To avoid this I use tiny pieces of scrap and glue them to the underside of the strips flanking the opening where the new strip needs to lay.
These strips get abandoned inside the deck for now, but will get cleaned up when I flip the deck. More on that later
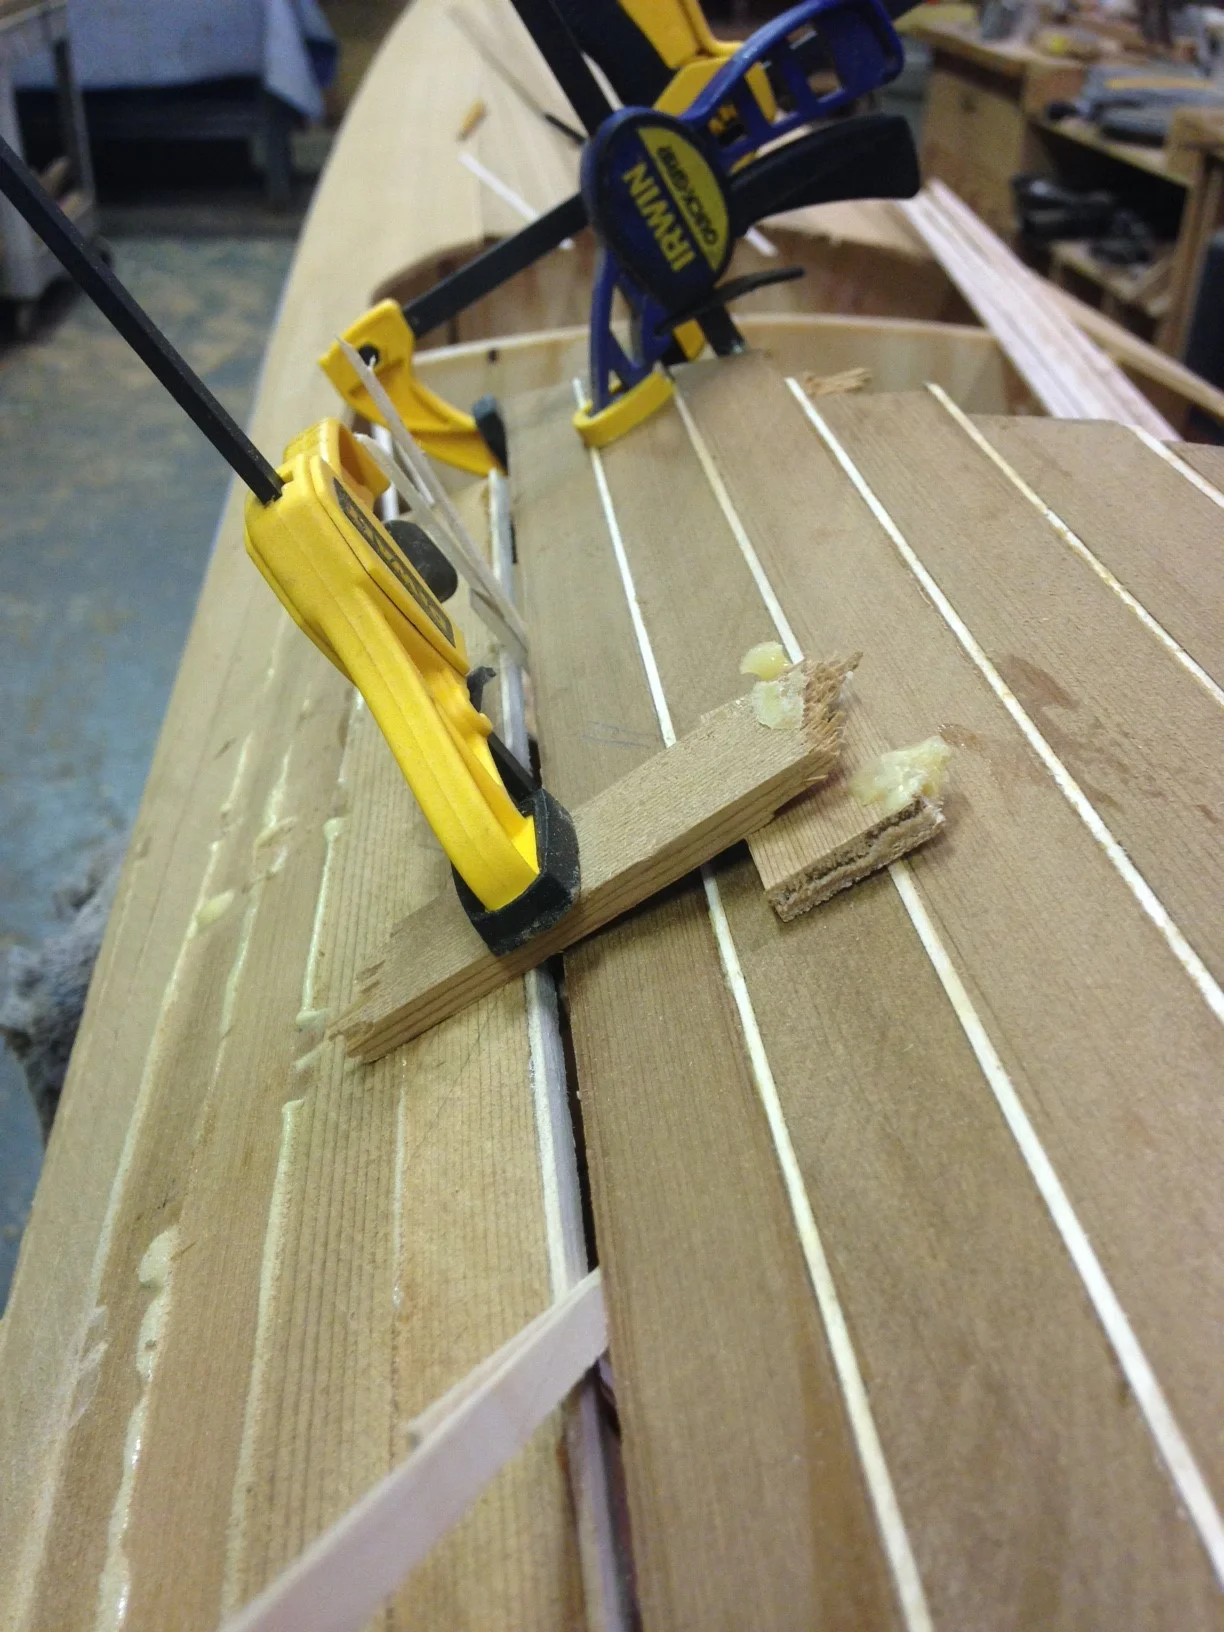
Strip after strip the deck starts taking shape. Due to the curve it's impossible to use conventional clamps, and the strips are so thin they need to have even pressure along the length of them to get a good tight joint.
Here i'm using scraps as wedges to fit the taper, and another scrap against the soft cedar to prevent any dents. The maple strip is super hard and didn't require protection.
As I got to the final tiny strips the clamping had to get even more creative, trying to get the existing curves of the sides to line up with the new curve created by starting at the center and working out. I cant have any lumps!
These maple strips are 1/16" wide and are applying outward pressure to the strip above.
It's almost sad putting the final strip in place, but there are 10,000 steps to move on to. With the final strip fixed in place I knocked off all the glue with a sanding block and wiped on some water for a photo. I'll need to spend many more hours sanding, but this was a reassuring moment seeing the whole deck and it's colors and contrasts.
Next on the list is finalizing the cockpit opening. The plans come with a suggested curve, which I printed full scale and modified to suit my preferences.
Making a smooth flowing curve is the idea here. Sharp scissors are key!
I laid the paper on the cockpit opening and used a pencil to trace it on the cedar. I flipped the paper for get the second side, to ensure symmetry.
I was wishing I had run all my strips a little longer to give myself a little extra meat to work with, but this will work fine.
I cut out the final cockpit opening with a narrow Japanese pull style saw, but found that even with an incredibly sharp saw it was tricky to cut because the deck is so thin that only one or two saw teeth are ever engaged in the wood at any time, and it tries to catch and snag. To control tear out I went over my pencil line with a razor knife to control fibers from lifting out beyond where it wanted them to.
Being very careful
The cockpit will eventually get a combing - a raised surround with a lip to keep water out, and allow a spray skirt to attach securely. The combing will need to be about 1 1/4" tall to function, and with the petite proportions of this kayak I want to minimize how tall visually appears to be. To do this I recessed the deck at the front of the cockpit so that the combing will only project about 1/4" at the center of the deck. This also creates a "gutter" that will channel water away when spray/waves are coming over the deck.
To start the combing I grabbed a pencil and started drawing curves onto the deck area in front of the cockpit. This crescent shaped area will be removed so that later when the pieces are connected with infill bits, a slope will be created.
I ended up cutting this with a razor knife - creating a back bevel which will come in handy for the infill strips
With the crescent shape removed I cut away a portion of the center strip of the deck. When I joined the remaining unsupported pieces together again they are lower than the deck.
This was test #1, in the end I removed the entire 3/4" center cedar strip
Combing Recessed!
The lines of the deck are very important to me, I wanted to maintain continuity for each strips along the full length. By removing the center cedar strip from the recessed area I created a challenge - How to keep the lines flowing!
I installed each maple stripe with a tiny dab of super glue making sure each lines up perfectly.
With the maple lines in place I needed to infill the voids with dark or light cedar depending on which part of the deck i'm lining up with . This wasn't as terrible as it looks, I would get a strip close to fitting, and if it was under sized I squeezed it in a clamp which actually made it bigger in every direction. Super glue kept me moving quickly, although I did occasionally glue my fingers to the kayak.
Working with tiny pieces is made easier with tiny tools!
The process of recessing this area took about 10 hours, but the result is well worth it, and it will look even better once I build the combing and it doesn't look awkward standing up in the breeze.
A little sanding and a splash of water!
With the deck construction complete, it was time to sand and fair out any remaining humps and dips. Several days of sanding later this is what the deck looked like. Ready to lay up the fiber glass!
Sanded and cleaned - ready to glass!
The glassing process is the same as the hull: lay on fabric, get it wet with resin, and scrape away all excess to minimize weight and make sure the glass is tight to the wood I carefully sanded to just the right shape.
I let the glass drape for a few days to release any wrinkles from being folded up.
My hands were too Gooey to take any photos during the wet out. It came out fantastic!
I timed the wet out so nobody would disturb me. No visits from friends, and no phone calls. The first resin hit the deck at around midnight. Resin cures faster with heat, so I jacked up the thermostat to 80F for a few hours prior to starting. That way the wood, air and resin were all be the same temp.
The biggest risk with glassing the hull is that resin can run into the seam between the deck and hull and accidentally stick the two pieces together. That would be a disaster.
I waited about three hours for the resin to set up to a "cold honey" consistency, so I could use a razor knife to cut the fiberglass weave,while it was pretty well stuck to the deck so it couldn't shift around or lift off. I slid the razor knife between the deck and hull and slowly worked my way all the way around the kayak. When I was confident the seam was not glued, I grabbed a mallet and started knocking out the plywood forms from the inside. The Hot melt glue I used to adhere the strips comes off with a few knocks from a mallet, so in just a few minutes I had removed all the forms which freed the deck to lift up just enough to slide some scraps in and ensure that while the resin cured fully, it could not come in contact with the hull and bond the two.
The deck has been detached from the forms and hull. It is FAR too weak to move, it needed to sit here for a few days while the resin came up to full strength.
Next i'll be setting the deck off to the side to work on cleaning up and fiber glassing the insides of the deck and hull.
Thanks for reading!!